
Brian Taylor 1/5.33 Spitfire build
|
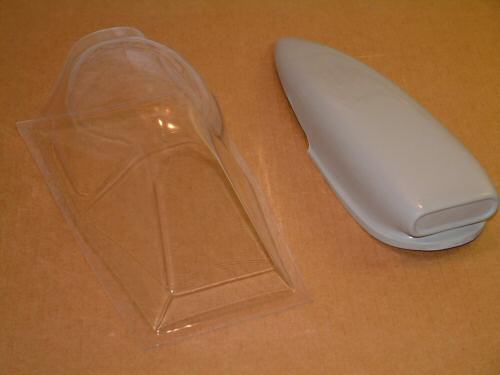
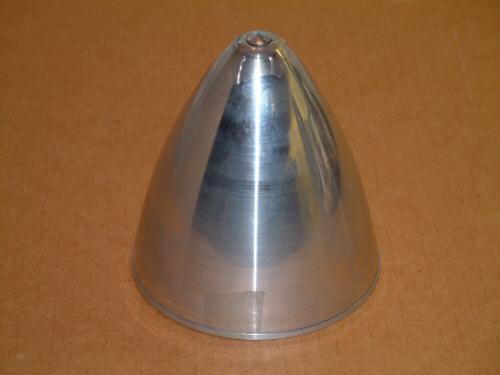
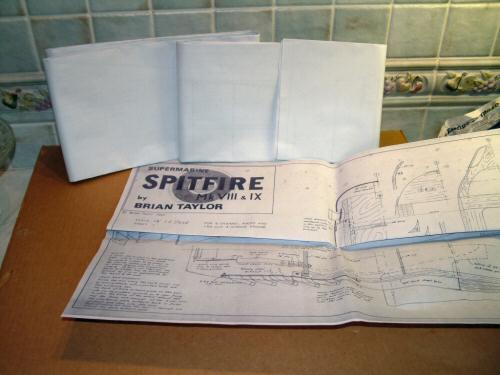
| Brian Taylor Plans Tel: +44 (0)1460 65694 (Cowl, Canopy, Carb scoop, Spinner, & Plans) |
 |
 |
 |
 |
 |
| 1. Click to enlarge | 2. Click to enlarge | 3. Click to enlarge | 4. Click to enlarge | 5. Click to enlarge |
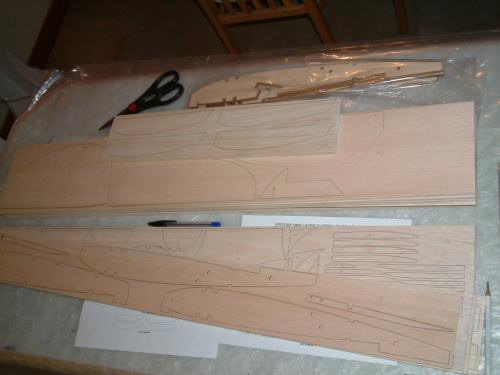
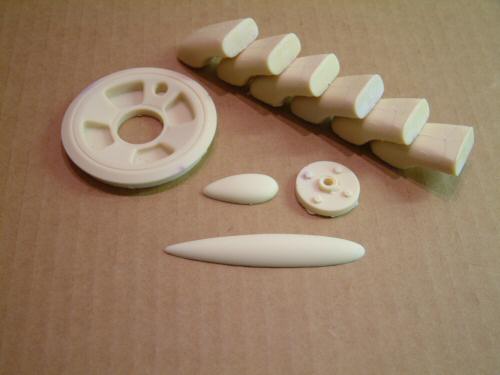
First parts to arrive were the primary ingredients. Pic 1. the cowl is an all in one section which is very well finished and very rigid. The lower cowl will be extended to give deeper "chin" as seen on the PR version. I have not decided how I will achieve this yet!. Pic 2. Inside the cowl is finished in course glass fibre which should give a good key when affixing to the wooden frame. Pic 3. Canopy and Carb scoop, the canopy will only be half used as the front section will be replaced with a single lamination of plastic. The main bubble canopy was conventional for early 1945 PR MKXI Spitfires, later canopies had additional domes installed on the sides to improve visibility for the pilots. The pre molded carb air intake will save a lot of time. I remember the scoop on the Mick Reeves Spitfire took several days to sand to shape. Pic 4. The aluminium spinner is nothing overly special but nicely shaped. Pic 5. The all important plans. Brian supplies the plans on 3 sheets, one for each wing and the third larger sheet for the fuselage. Very nice looking plans on inspection, detailed to a similar level as the Reeves Spitfire plans. I am hoping that there are fewer inconsistencies between the plans and the laser cut parts as experienced with the CNC cut parts for the Mick Reeves model. All in all very these are nice parts. |
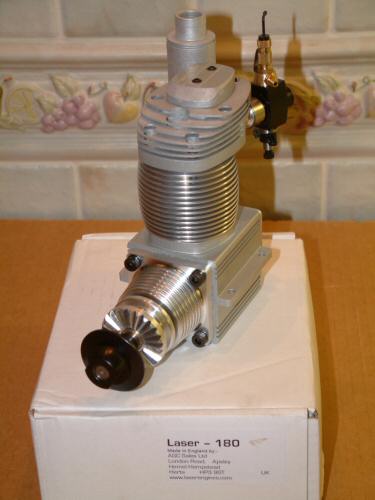
| Laser Engines: http://www.laserengines.co.uk |
 |
 |
 |
 |
 |
| 1. Click to enlarge | 2. Click to enlarge | 3. Click to enlarge | 4. Click to enlarge | 5. Click to enlarge |
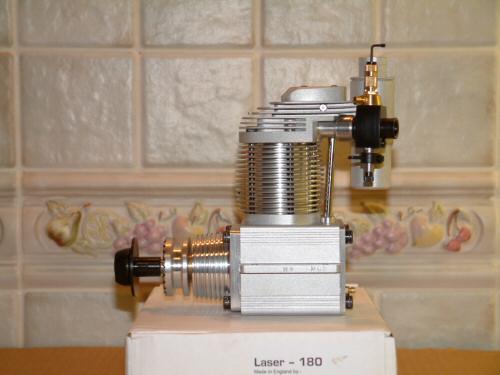
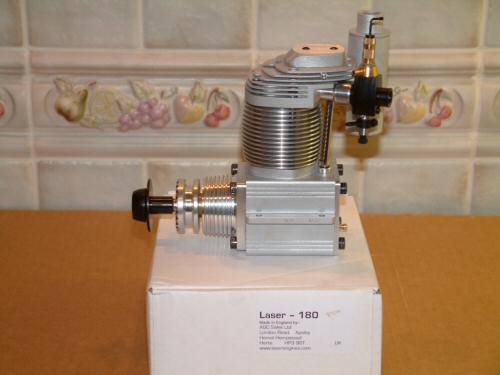
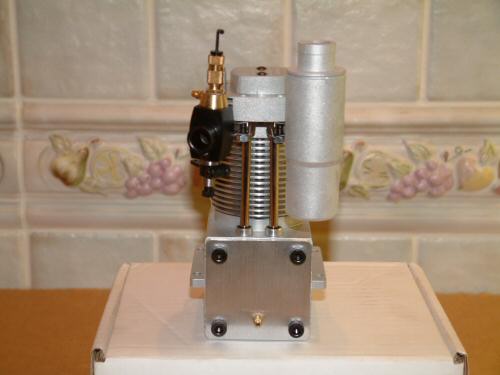
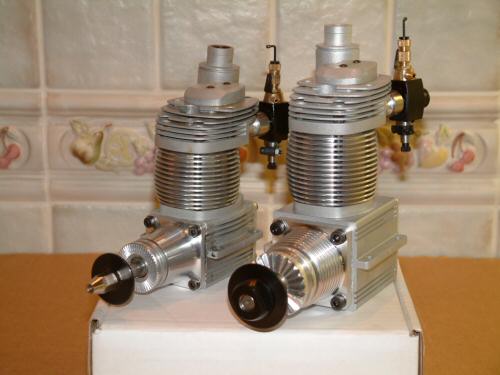
The Laser 180 is simply a Laser 150 with a longer stroke so I understand. Basic stats are: Bore 33.5mm Stroke 33.3mm, Weight 1,200grams, Height from centre of crankshaft to top of rocker box cover 114mm. Width of crankcase between bearers 57.15mm Crankshaft thread M10 x 1.5. The engine stands 14mm taller than the Laser 150 (from the engine bearers). With any look this should fit in the cowl nicely, especially with the deeper chin of the PR MKXI. Pic 1 - 4 general shots of the motor. Pic 5 shows the difference in size to the Laser 150 (left). The 1.8 can turn a Classic Master 20 X 6 at 7,000 RPM according to Neil Tidy. Can't wait for the running in process. |
| Bob Holman Plans http://www.bhplans.com/ |
 |
 |
 |
| 1. Click to enlarge | 2. Click to enlarge | 3. Click to enlarge |
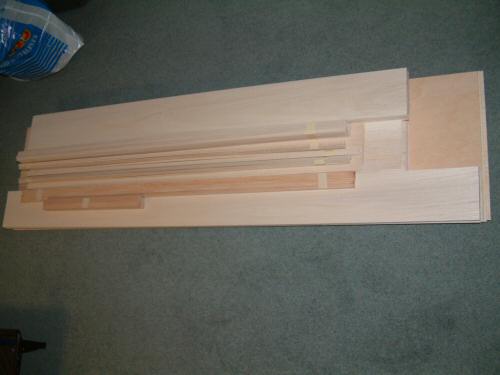
| The Laser cut parts from Bob Holman are well known by the modeling fraternity. Having today received my first package from him , I can say that I am very impressed by the packaging and the apparent care that has been taken to cut and package these parts. Just enough power has been used to cut the components resulting in an almost negligible charring of the edges. Pic 1. General view of the supplied wood. Pic 2. the ply components are equally impressive. Pic 3. for an extra $5.00 you can have the spars that support the retracts cut from ply wood. Well worth the extra cost. All wood checked and found to be complete. Nothing joined yet but from what I have heard there should be no issues! |
| VicRC.com http://vicrc.com/ |
 |
 |
 |
 |
| 1. Click to enlarge | 2. Click to enlarge | 3. Click to enlarge | 4. Click to enlarge |
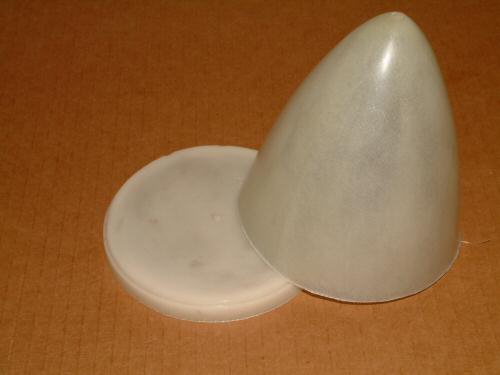
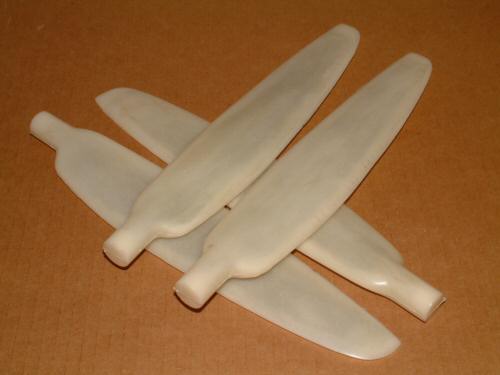
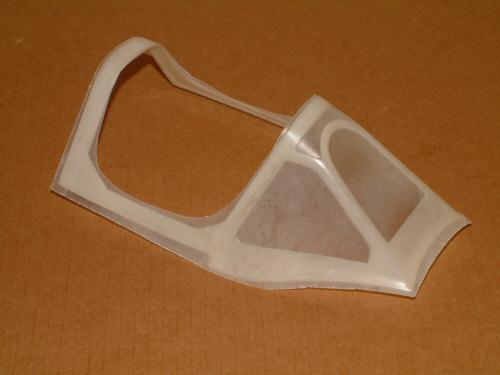
Parts arrived from Vic in a well packed box. Pic 1. The spinner is all glass and produced to a good standard. The shape appears to be very true to the spitfire cone from what I can see. Pic 2. Props are 2 halves glass cast and joined together, much better construction compared to the plastic parts supplied with the Mick Reeves model. Pic 3.The canopy will require heavy modification for the MKXI however, I purchased this canopy frame because I have to start somewhere! It's a tidy unit and should prove very useful in the project. Pic 4. The radiator scoops are nicely shaped and constructed from just the right weight of glass and resin. I have seen many different methods for attaching and "decorating" these units, and it will prove to be an interesting part of the process. These components are very nice indeed! |
| Shindin Machine: http://www.rcsites.net/shindin/ |
 |
 |
 |
 |
 |
 |
| 1. Click to enlarge | 2. Click to enlarge | 3. Click to enlarge | 4. Click to enlarge | 5. Click to enlarge | 6. Click to enlarge |
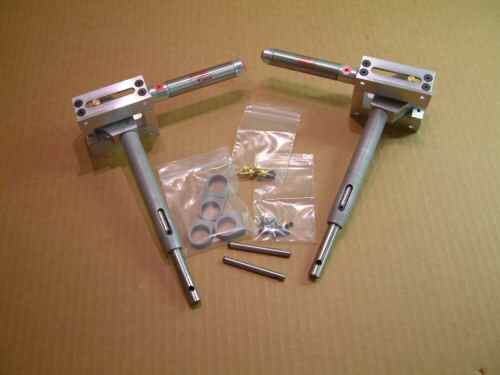
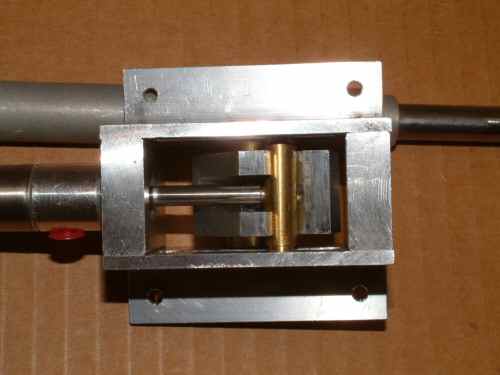
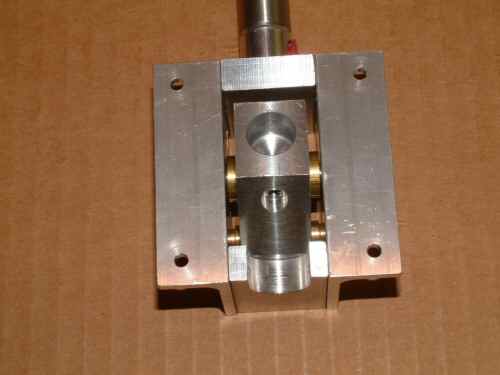
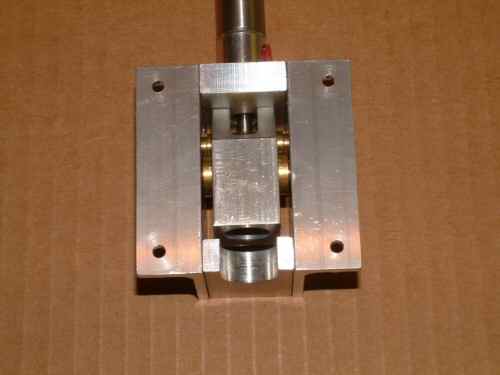
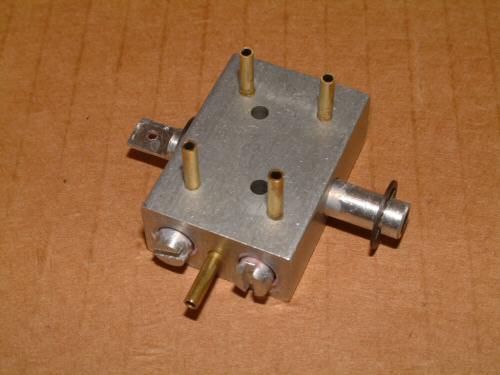
Pic 1. What was in the box, Retracts, door mounts, air nipples, and fixing screws. Everything looks nice and beefy with little movement from the oleo's in the down position. Pic 2. Close up of the push bar and bush. Very solid construction and very neat machining. Pic 3 & 4. in the up and down position. Pic 5. Compression of the spring is much easier then the Reeves oleo legs. With a firm grip I can push the leg all the way to the stop. With the Reeves Oleo's I can get about 1/4" to 1/2" at best! Certainly I thought the Reeves springs were too stiff, but these are much softer. I am not qualified to comment, but they will certainly give more that's for sure. Pic 6. Wheel in fully down position at the required angle of 97°. |
| Retractable Tail Wheel: Chad Veich |
 |
 |
 |
| 1. Click to enlarge | 2. Click to enlarge | 3. Click to enlarge |
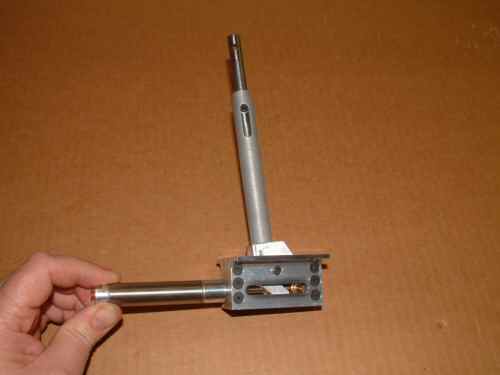
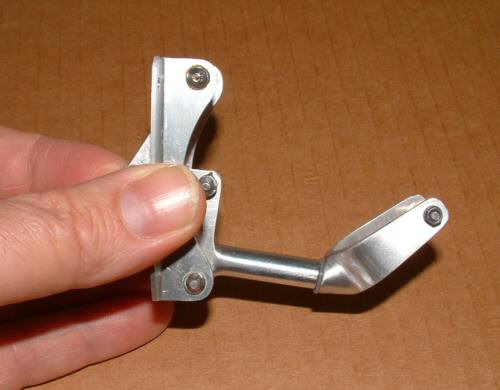
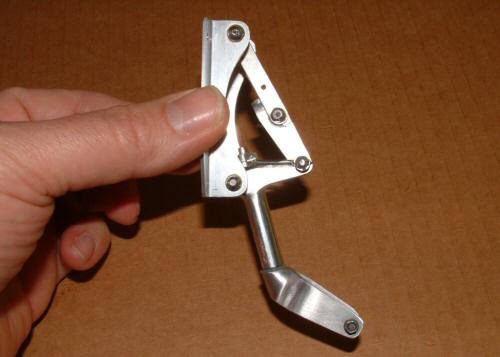
The tail wheel was a lucky catch from a thread I started on RC Universe. I had a great response (as you very regularly do) and several very good ideas came my way, including a design schematic - Thanks Dibble!. Pic 1. The unit produced from aluminium and steel, and construction is very tidy. The wheel is held in a central position with 2 small springs, visible in the middle of the unit. Having experience of a fully free tail wheel on MK923 I think this will be a great assistance. Pic 2. In the up position (it will go further). Pic 3. in the down position. This was a good buy in my opinion. |
| Miscellaneous #1 |
 |
 |
 |
 |
| 1. Click to enlarge | 2. Click to enlarge | 3. Click to enlarge | 4. Click to enlarge |
| Pic1. As for the Reeves Spitfire I have purchased my wood from "The Balsa Cabin" http://www.balsacabin.co.uk/. I ordered materials for most of the build in one go. Excellent service (next day delivery) and you even get a choice of grain and hardness! I have chosen to use spruce for the main spars rather than balsa this time. In addition the wing sheeting will be upgraded from 1/16" to 3/32". Both of these amendments appear to be popular with builders so I will following the masses as it were. Pic 2. From a UK forum www.rcmodelflyers.co.uk/ I made contact with a fellow builder who very kindly cast the stacks for me and some additional parts which I will consider using at a later date. Thanks "thescaleman" Pic 3. The air system is a new thing for me and I eventually made contact with Phil Clark at Fighter Aces who was very helpful and explained the basics to me. I ended up with a standard 22 cu.i tank 2" x 7", quick connectors, 2 colours of tubing, "T" connectors, fill valve, and a Century Jets valve. Pic 4. A close up of the valve and the 4 independent air screw adjustors. This gives control of all movements up and down independent to each other! |